United States
 Australia
 Republic of Ireland


Beginners guide to Wallpaper – Tools
The day has come. Your wallpaper has just arrived in the post. You’re staring at your blank wall... you’ve now realised that you have no idea how to put your new wallpaper up. After getting carried away scrolling through pages and pages of beautiful, high quality wallpaper, it’s easy to forget the reality of applying it to your walls. Luckily, that’s what the internet is for! Unfortunately we cannot crawl through the screen and help you put your fabulous paper up but we can sure give you some tips and tricks as to how to get started.
In this first blog post we’ll start with the tools you should consider getting to make your wallpapering experience go a lot more smoothly.
Batch Checking
The first thing you should do when you receive your wallpaper order is check, double check and then triple check that your wallpapers have all come from the same batch. If you order a number of rolls in one order, then the wallpaper retailer will check this before then send it to you, but it is always important that you have a look too before you try applying it to the wall. If you realise that you have not ordered enough rolls of wallpaper and need to order more, make sure you contact the seller beforehand to check that they have that batch in stock. The batch number should be found clearly on the label in the form of a letter or sometimes a letter. It can be a bad idea if you ignore these batch numbers as different batches can be slightly different colours, have different sized patterns or will not match offset pattern repeats.

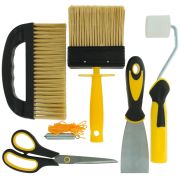
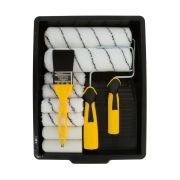
Tools
These tools are here to make this wallpaper malarkey a lot easier for you, and if all else fails at least it makes you look like you know what you're doing!
Making sure you hang your wallpaper straight
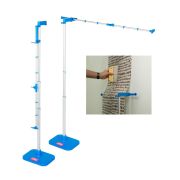
One of the things that many people don't realise about wallpapering is that it is essential to use a plumb line. It's something that many people don't think about, but it seems obvious when it's mentioned. In most older homes, and even in some new homes, the walls are not directly straight and can often twist and turn with age. Therefore, plumb lines make it easy to check that you're hanging the wallpaper correctly. First thing you have to do is measure the length of the wallpaper along the top of the wall and mark it with a pencil. From the top of the wall, pin the plumb line and let it hang, letting gravity do its thing! When it becomes still, mark down the plumb line so it makes a straight line.

Cutting tools
The first thing you'll want to do when you receive your wallpaper (assuming that you have already measured your walls) is cut the strips to size. You will cut them longer than is required so you have spare hanging wallpaper at the bottom which will allow for a more accurate seam at its base. It is very important that you have a sharp and sturdy pair of scissors. When it comes to cutting wallpaper, a blunt pair of scissors will not make things very easy for you. Our scissors are precise and accurate, perfect for all types of wallpaper. They are made from high quality stainless steel to guarantee a long life!
Mako Wallpaper Cutting Edge- The Mako 'cutting edge' tool is perfect for trimming a straight edge where the wallpaper meets either the skirting board or the ceiling. Again, the 50cm blade is made from stainless steel, maintaining its life. Furthermore, the measuring scale along the blade aids you in precise trimming. Also creates a great guide for cutting thicker bits of paper with a knife.

Mako Wallpaper Cutting Knife- This tool is perfect for cutting all types of wallpaper, including woodchip and vinyl wallpapers which are a bit thicker. It is great for trimming wallpaper, and can be used alongside the cutting edge which can act as a guide.
Pasting
Now here's the messy exciting bit! The wallpaper is finally ready to be prepped before it is put on the wall. Over on our website we have a variety of wallpaper pastes, such as the All-Purpose Wallpaper Adhesive which requires mixing or a ready-to-use wallpaper paste. To apply the paste, we recommend using our large pasting brush, which is ideal for applying primers and pastes. The head can be attached to a broom for those harder to reach areas. Be sure to check if your wallpaper is paste the paper or paste the wall, as this can determine if you have to soak your paper in the paste prior to applying to the wall. Paste the wall wallpapers require you to simply paste the wall underneath the wallpaper which does not require you to soak the wallpaper beforehand.

Smoothing tools
Hoorah, your wallpaper is up! You've finished pasting your wallpaper and you have placed the top half of the roll to your wall. Believe me, the hardest part is over. At this stage, your next task can be argued as being rather therapeutic and satisfying (or am I weird?). This is where you'll need to take one of our brushes and smooth out all of the air bubbles until your wallpaper is completely flat and seamless. However, there is a range of brushes that work for different purposes, and here they are:


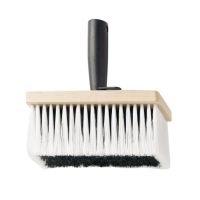
Mako Wallpaper Hanging Brush- This bristle brush is perfect for gently smoothing out bubbles and creases that may appear while wallpapering. This tool is particularly handy when it comes to smoothing curved walls or wallpapering around a sharp bend.
Mako Flexible Wallpaper Smoother- Like the hanging brush, this tool is ideal for smoothing out bubbles, creases and wrinkles. As it uses the plastic edge to smooth imperfections, it is a lot more accurate on the smaller bubbles. However, it is not as gentle around the more delicate areas. Nevertheless, the flexible plastic will move to the rhythm of your hand.
Mako Foam Wallpaper Seam Roller- This foam seam roller is a must for the wallpaper tool cupboard. Having a roller on an extended handle is great for reaching those far corners and tackling the air pockets which may appear at the seam of the wallpaper.
So there we have it, a quick and simple guide to all things wallpaper tools. After the first strip of wallpaper is on the wall you will feel like a pro! The next blog in this series will be on prepping and priming the desired wall before wallpapering, including how to remove old wallpaper! Hope this has helped, and don't hesitate to contact us if you need any more help.
Instagram Facebook Twitter Houzz Pinterest
Sophie