United States
 Australia
 Republic of Ireland


Wallpaper Murals: A Unique and Creative Way to Decorate Your Home | Tutorial
Wallpaper murals have become increasingly popular in recent years as people look for unique and creative ways to decorate their homes. The large-scale prints offer an excellent way to make a statement in any room, adding interest and personality to the space.

Wallpaper has been used in homes for centuries, with the earliest examples dating back to the 16th century. However, wallpaper murals only gained popularity in the 19th century, as printing technology improved and the demand for large-scale, decorative designs increased. These murals were often used in grand houses and public buildings, with scenes from nature, landscapes, and historical events being popular subjects.
Today, wallpaper murals are used in a variety of settings, from homes to offices, restaurants, and hotels. They can be used to create a focal point in a room or to add a sense of depth and dimension to a space. They are available in a wide range of designs, from photographic landscapes to abstract patterns, and can be customized to fit any size or shape of wall.
Installing a wallpaper mural can be a bit intimidating if you have never done it before. In this article, we will cover everything you need to know to successfully install a wallpaper mural - the tools required, how to prepare the wall before installation, and some useful tips, all broken down into easy-to-follow steps to ensure you are left with a wall that is sure to impress.
Before you begin
Before you begin your wallpaper mural project, measure your wall accurately prior to ordering your wallpaper mural to ensure you get the correct size. Make sure to order a few extra inches of material on all sides to ensure a perfect fit. Once you're happy with your choice, you will need to gather the necessary tools.
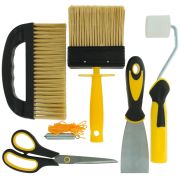
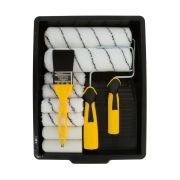
Tools required
- Wallpaper paste or adhesive
- Smoothing tool
- Utility knife
- Tape measure
- Level
- Pencil
- Scissors
- Plumb line
- Paintbrush or roller
- Step ladder
Preparing the wall
An important thing to do before you begin is a proper preparation of the wall, this is essential to ensure a successful installation. Make sure the surface is clean, smooth, and free of any bumps, cracks, or holes. Remove any existing wallpaper. If necessary, fill any holes or cracks with a filler paste, leave to dry completely and sand smooth. Clean the surface with a mild detergent and water to remove any grease. Allow the wall to dry completely before proceeding.
It might be a good idea to paint the wall before applying your wallpaper mural to make sure the base has a light and even colour. Especially if the surface you are about to wallpaper had sections in many different or bold colours, as the colour might show through the mural. If you decide to paint the wall prior to applying a wallpaper mural, again make sure the paint is completely dry before moving onto the next step.
- Remove any existing wallpaper
- Remove all nails and hooks you won't be using anymore
- Fill any holes and cracks, let completely dry
- Ensure the wall is smooth by removing all bumps with sandpaper
- Remove grease and debris with mild detergent
- Always allow the wall to dry completely before proceeding
Measure and cut
You should have already measured the wall where you will be installing your mural. Once you have the wallpaper mural at hand, unroll it and lay it flat on a clean surface. Use a pencil to mark where you will need to cut the material to fit the wall, always leaving a little extra at the top and bottom to allow for trimming.
Using a level to provide a straight line, make a mark on the wall with a pencil where the first panel of your mural will be applied.
How to Install a Wallpaper Mural
Apply adhesive
Next, apply wallpaper paste or adhesive - always be sure to follow the manufacturer's instructions for mixing and applying the paste. Apply the paste evenly to the entire back of the mural or directly on the wall using a wallpaper brush or roller, depending on whether your mural is paste the wall or paste the paper - this information is always stated on the roll and can be found in the product description too.
Install the wallpaper mural
Starting at the top of the wall, carefully align the wallpaper mural with the ceiling and press it firmly into place. Use a smoothing tool to smooth out any air bubbles or wrinkles from the center of the mural outwards as you work your way down the wall. Use a level to make sure the mural is straight as you go or follow the pencil marks you have measured and made prior to hanging your mural. Trim the excess material at the top and bottom of the wall using a utility knife or scissors. Be sure to overlap the edges and match the pattern as you go. When you reach the bottom of the wall, use a wallpaper smoother to ensure that the mural is firmly adhered to the wall.
Additional tips
Installing a wallpaper mural can seem daunting at first, but with the right tools and preparation, it can be a fun and rewarding project.
- It is important to handle the wallpaper mural carefully to avoid tearing or creasing it.
- If the wallpaper mural has a repeating pattern, be sure to match the pattern carefully as you install it.
- If you need to overlap multiple sections of wallpaper, make sure to match the patterns precisely.
- If you are installing the wallpaper mural in a high-traffic area, you may want to consider applying a protective coating to prevent damage.
Choose the perfect mural for your home
If you are reading this article, the chances are you already found the perfect match for you home and are just looking for guidance on how to glorify your wall safely while minimizing mess and to avoid any damage an incorrect application might cause. But if you are still searching for inspiration and a design to fit your room, visit our website to see the whole range of wall murals we offer. Here are some of them to inspire you:
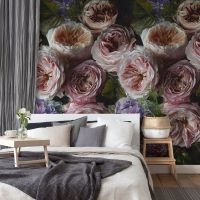
Romantic Flowers Wallpaper Mural by Grandeco

Vertical Marble Wallpaper Mural by Grandeco

Distressed Brick Wallpaper Mural by Grandeco

We hope you find this guide useful and that it will help you with your projects. Browse our website to choose the perfect match for your home and don't forget to share with us the results. We love seeing the photos of your home transformation, so tag us @worldofwallpaperuk on Instagram.
Have a wonderful and inspired day,
Michaela - Online Merchandising Assistant @ World of Wallpaper